


Knowing how to use VPN on iPhone is essential for anyone who wants to protect their privacy, bypass geo-restrictions, or secure their connection on public Wi-Fi. Whether you’re looking for a quick app-based setup or a manual configuration through iOS Settings, this guide walks you through every method clearly. You’ll also learn how VPNs interact with your iPhone’s location, what risks free VPNs carry, and how to choose the right protocol. For reliable VPN recommendations, VPNSelect covers everything you need.
What Is an iPhone VPN and How Does It Work?
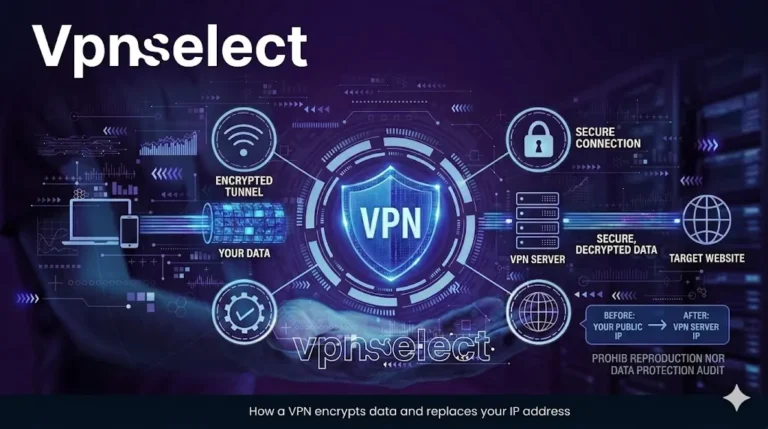
A VPN on iPhone is a security tool that encrypts your internet traffic and routes it through a remote server, masking your real IP address and protecting your data from third parties. Understanding how it functions helps you use it more effectively across different situations.
How Does a VPN Hide Your Real IP on iPhone?
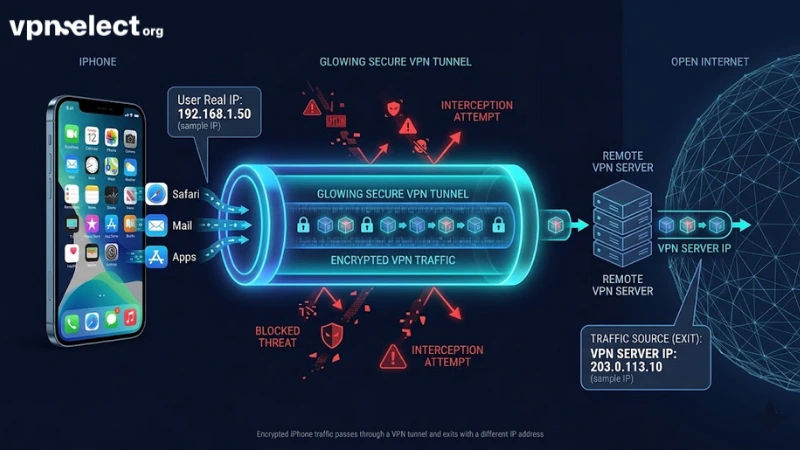
When you activate a VPN on your iPhone, all outgoing traffic passes through an encrypted tunnel to a VPN server located in a different region. The websites and services you visit see the server’s IP address instead of your own. This process uses encryption protocols such as IKEv2, IPsec, or WireGuard to ensure your data cannot be intercepted in transit.
iOS natively supports IKEv2 and IPsec, which means some VPNs can operate without installing a third-party app. The encryption happens at the network layer, so every app on your device – Safari, Mail, social media – benefits from the same protection while the VPN is active.
Why Do Users Change Location via VPN on iPhone?
Users learning how to use VPN to change location on iPhone typically have one of three goals: accessing streaming content unavailable in their country, maintaining privacy while traveling abroad, or bypassing network restrictions on school or workplace Wi-Fi.
For example, connecting to a US-based VPN server allows an iPhone user outside the United States to access region-locked content on streaming platforms. However, it’s important to understand that a VPN changes your visible IP-based location – not your GPS coordinates – which affects browser-based location but not all app-level location services.
How Do You Set Up a VPN App on iPhone?
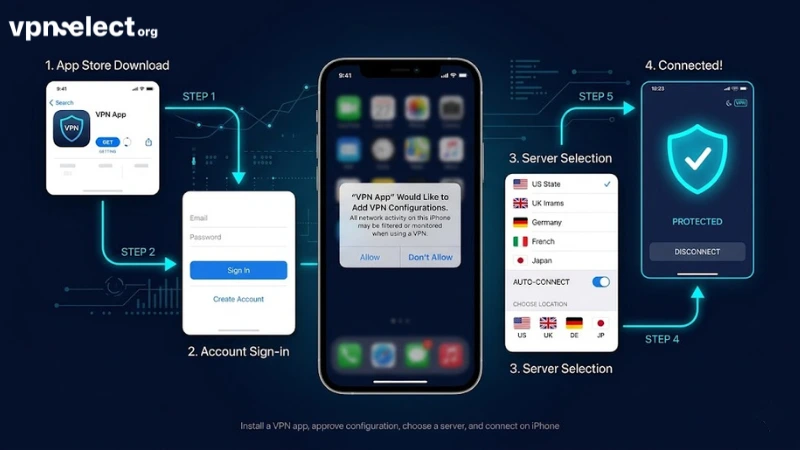
Setting up a VPN on iPhone via an app takes 3 steps: download, authenticate, and connect – making it the fastest method for most users. App-based VPNs handle all technical configuration automatically, which is why most beginners prefer this approach.
Steps to Install and Connect a VPN App on iPhone
To use a VPN on iPhone through an app, follow these steps:
- Open the App Store and search for your chosen VPN provider.
- Download and install the app, then open it and create or log in to your account.
- Grant the app permission to add a VPN configuration to your iOS network settings when prompted.
- Select a server location from the app’s list and tap Connect.
- A VPN indicator will appear in the iPhone status bar when the connection is active.
The app manages protocol selection, server switching, and kill-switch features automatically. This is the recommended path for users who want to know how to use free VPN on iPhone as well – many reputable providers offer free tiers directly through their apps on the App Store.
What Does “Add VPN Configuration” Mean on iOS?
When a VPN app requests permission to “Add VPN Configuration,” it is asking iOS to install a VPN profile into your device’s Settings under General → VPN & Device Management. This is a standard iOS security prompt and does not give the app access to your personal files.
Approving this prompt allows the VPN to establish encrypted tunnels through iOS’s built-in network stack. You can view, enable, or delete these configurations manually at any time in your iPhone Settings. If you ever uninstall a VPN app without removing its profile, the configuration may remain – it’s good practice to delete unused profiles to keep your network settings clean.
How to Set Up a VPN Manually in iPhone Settings?
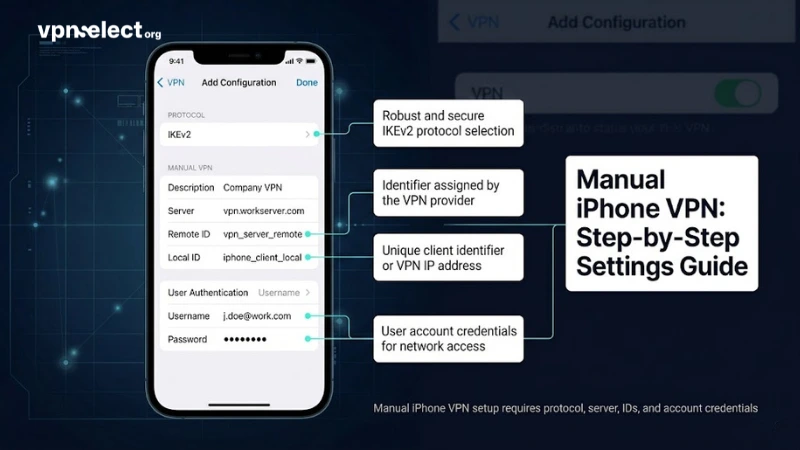
Manual VPN setup on iPhone involves 4 key fields – server address, account credentials, protocol type, and authentication method – and is completed entirely within iOS Settings without downloading any app. This method suits users who receive VPN credentials from an employer or IT administrator.
How to Configure IKEv2 or IPsec Manually on iOS?
To configure a VPN manually on your iPhone:
- Go to Settings → General → VPN & Device Management → VPN → Add VPN Configuration.
- Select your protocol type: IKEv2 or IPsec.
- Enter the Description (a label for your reference), Server address, Remote ID, and Local ID provided by your VPN provider or administrator.
- Under User Authentication, select Username and enter your credentials.
- Tap Done, then toggle the VPN switch to connect.
IKEv2 is the most stable option for mobile use because it reconnects automatically when your iPhone switches between Wi-Fi and cellular. IPsec (L2TP/IPsec) is older but widely supported. For a broader comparison of protocols and provider options, the VPN Guide section at VPNSelect offers detailed breakdowns.
When Should You Use Manual Setup Instead of an App?
Manual setup is the right choice when: your organization provides VPN credentials for a corporate network, you want to avoid installing third-party software, or you need to connect to a specific server without using a provider’s client app.
It’s also relevant if you want to understand how to use VPN on iPhone without app – a question common among users on managed devices where app installations are restricted. The trade-off is that manual configurations do not include advanced features like a kill switch, split tunneling, or automatic server selection, which most dedicated apps provide.
Can a VPN Really Change Your Location on iPhone?
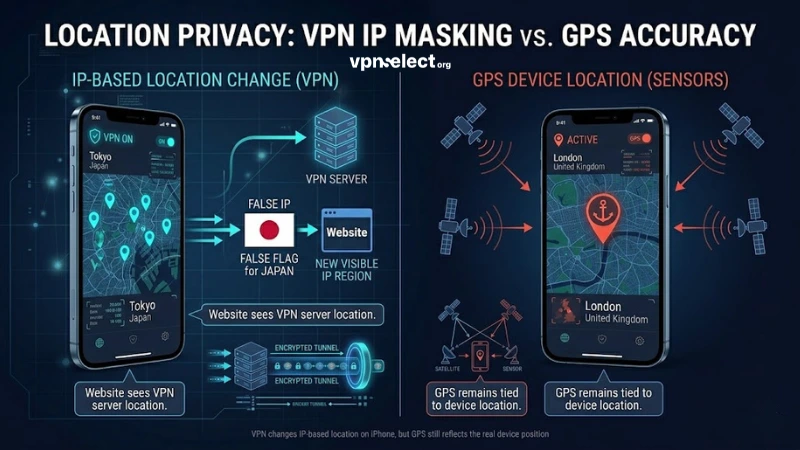
Yes, a VPN can change your location on iPhone in terms of IP address, which affects region detection on most websites and streaming services – but it does not change your GPS coordinates. Understanding this distinction prevents confusion when location-dependent apps behave unexpectedly.
Does a VPN Change GPS Location or Just IP Address?
A VPN only changes your IP-based location. Your iPhone’s GPS signal is determined by hardware sensors and transmitted separately from your network traffic, so apps that rely on GPS – such as Maps, Uber, or location-tagged social posts – will still show your actual physical location even when a VPN is active.
Services that detect location through IP address – such as streaming platforms, search engines, and some websites – will see the VPN server’s location. This is why a VPN is effective for accessing geo-restricted content but not for spoofing your location in GPS-dependent apps.
How to Spoof iPhone Location with VPN and Other Tools
For users who need to change GPS location in addition to IP address, a VPN alone is insufficient. Full location spoofing on iPhone typically requires additional tools such as a desktop application that mounts a virtual GPS location via a computer connection, or a developer mode configuration available on some iOS versions.
Some third-party location spoofing apps exist, but many require a jailbroken device, which compromises iOS security. For standard use cases – such as accessing region-locked content – knowing how to use VPN to change location on iPhone via IP masking is sufficient and does not require any additional tools.
What Should iPhone Users Know Before Choosing a VPN?
Before selecting a VPN for your iPhone, three factors matter most: the security risks of free options, the protocol differences that affect speed and stability, and the impact on battery life. Making an informed choice here ensures you get reliable protection without unexpected trade-offs.
What Risks Do Free VPNs Pose on iOS Devices?
Free VPNs on iOS carry several documented risks. Many free providers monetize by logging user data and selling it to advertising networks, which directly contradicts the privacy purpose of using a VPN. Some free apps on the App Store have been found to contain malware or transmit data to third-party servers without disclosure.
If you want to know how to use free VPN on iPhone safely, the most reliable approach is to choose a reputable provider that offers a free tier – such as a data-capped free plan from a paid provider – rather than an entirely free, unknown app. Checking the provider’s privacy policy and independent audit history is essential before trusting any VPN with your iPhone traffic. For a vetted list of options, Best VPN recommendations at VPNSelect are regularly reviewed and updated.
What Is the Difference Between IKEv2 and WireGuard?
IKEv2 and WireGuard are both strong VPN protocols, but they serve different use cases. IKEv2 excels in mobile stability – it reconnects seamlessly when switching networks and is natively supported by iOS without any third-party app. WireGuard is a newer protocol that offers faster speeds and a smaller code footprint, making it more efficient on battery and processing resources.
For most iPhone users, WireGuard is the better choice when available through a VPN app, as it delivers superior performance on modern devices. IKEv2 remains the practical default for manual setups and corporate VPN configurations where WireGuard is not supported. Understanding this difference helps when comparing options on VPN Select.
Does a VPN Affect iPhone Battery and Performance?
Yes, using a VPN on iPhone does have a measurable effect on battery life and performance, primarily because of the constant encryption and decryption processes running in the background. The degree of impact depends on the protocol used – WireGuard is significantly more battery-efficient than older protocols like L2TP/IPsec.
In general, expect a 10–20% increase in battery consumption when a VPN is actively connected during heavy use. Performance impact on internet speed depends on server load and physical distance to the VPN server. Choosing a nearby server and using a modern protocol minimizes both battery drain and speed reduction.
Conclusion
Using a VPN on iPhone is straightforward once you understand the methods available and the trade-offs involved. App-based setup is the fastest and most feature-rich approach, while manual configuration via iOS Settings suits corporate users or those who prefer no third-party apps. VPNs effectively mask your IP address and help you change your apparent location for geo-restricted content, but they do not alter GPS signals. When choosing a provider, prioritize verified privacy policies, modern protocols like WireGuard, and avoid unvetted free VPNs that may compromise the very privacy you’re trying to protect.
For detailed protocol guides, side-by-side provider comparisons, and setup tutorials for other platforms – including how to set up VPN for Android and how to set up VPN on router – visit VPNSelect for trusted, up-to-date guidance tailored to every device and use case.

Leave a comment