


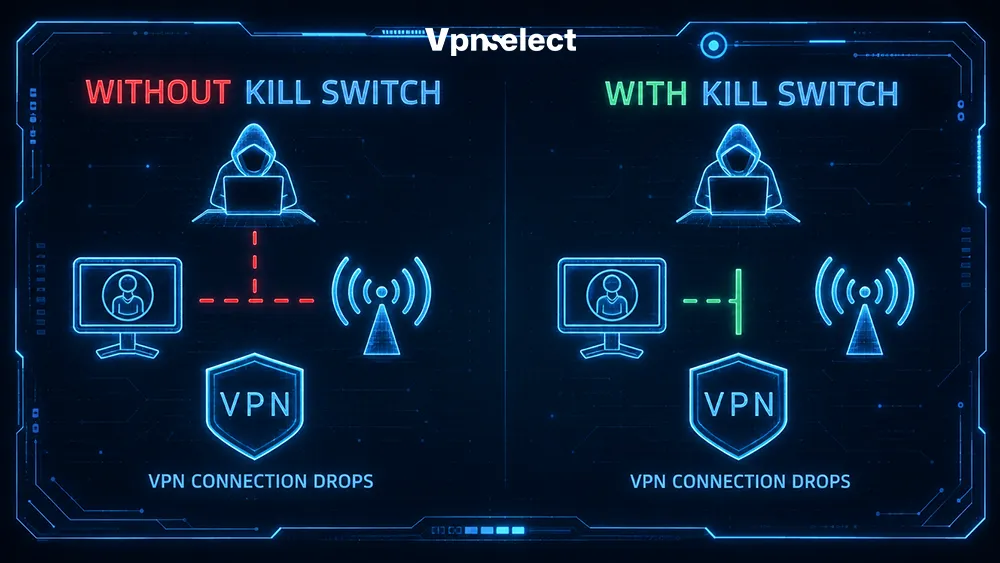
A VPN kill switch instantly cuts off your internet if the VPN drops, keeping your location and data hidden from prying eyes. It protects against sudden leaks, whether you’re on public Wi-Fi or switching networks. We explore how it works, the main types, and practical ways to make sure it always keeps your connection secure.

What Is a VPN Kill Switch and Why Does It Matter?
A VPN kill switch acts like an electrical circuit breaker for your internet connection. When the VPN tunnel fails, it instantly cuts off all traffic, keeping your IP and DNS data safe.
Common reasons VPN connections drop:
- Switching between Wi-Fi and mobile networks
- Weak or unstable public Wi-Fi signals
- Router hiccups or network interruptions
- VPN server outages or software crashes
Risks without a kill switch:
- Immediate fallback to your ISP connection
- Exposure of your real IP and location
- DNS requests leaving the secure tunnel
- Accidental transmission of sensitive data
Why this matters in the real world: If you are downloading a file, trading cryptocurrency, or accessing a banking app at a local coffee shop, a split-second Wi-Fi hiccup will instantly expose your active session data to the public network without a kill switch standing guard.
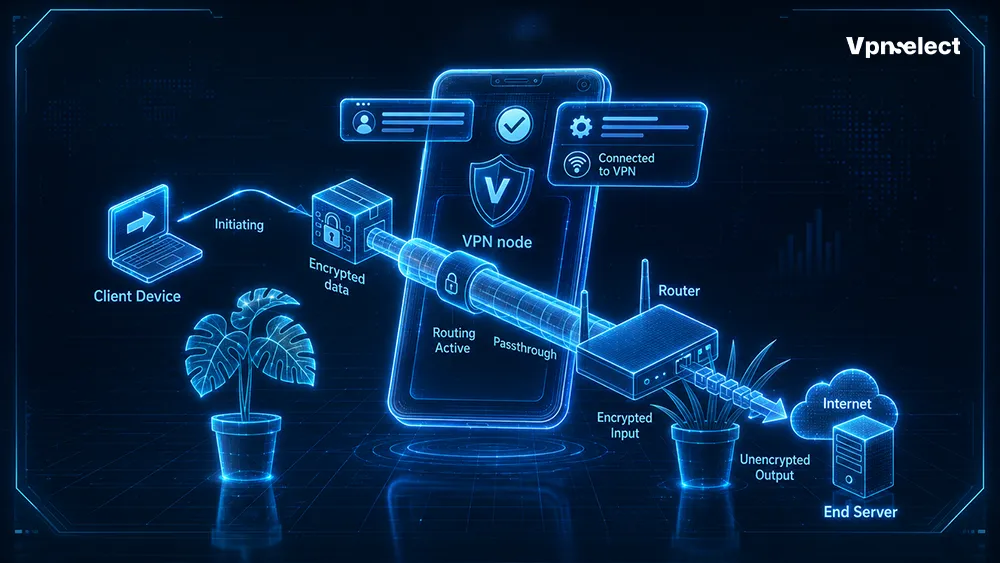
How It Works: Inside the Technical Process
The kill switch monitors your VPN connection and blocks traffic the moment it fails. Here’s how it operates in four simple steps:
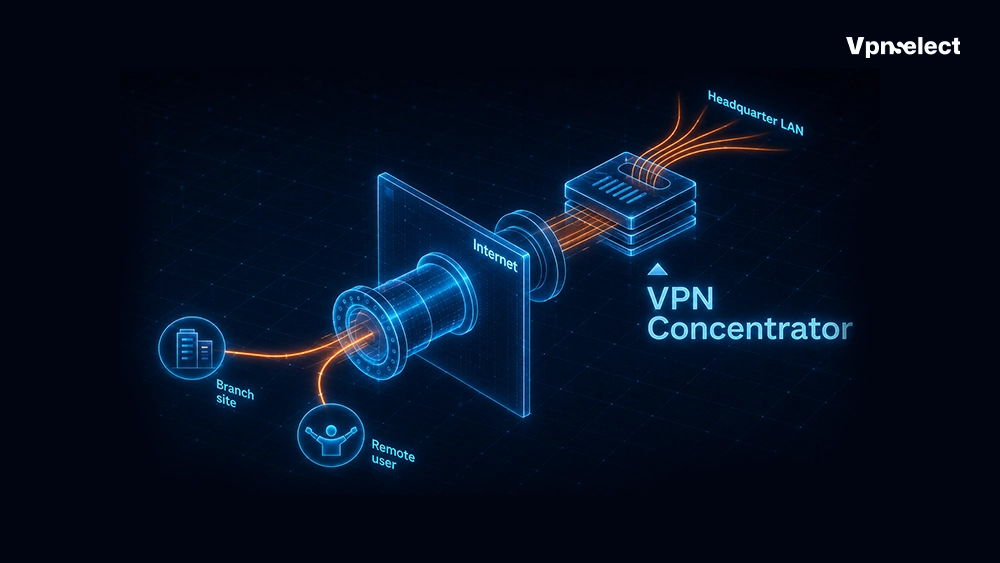
- Establishing the secure tunnel: Your device connects to the VPN server, encrypting all traffic and routing it through servers efficiently. While consumer apps connect to standard servers, enterprise setups often utilize a specialized tool. If you are wondering what is a VPN concentrator, it is designed to centralize thousands of user connections simultaneously.
- Continuous monitoring: The software checks the VPN connection health in real-time.
- Triggering the block: If the connection drops, firewall rules or routing tables instantly stop outgoing data.
- Restoring access: Once the VPN reconnects, normal internet traffic resumes safely.
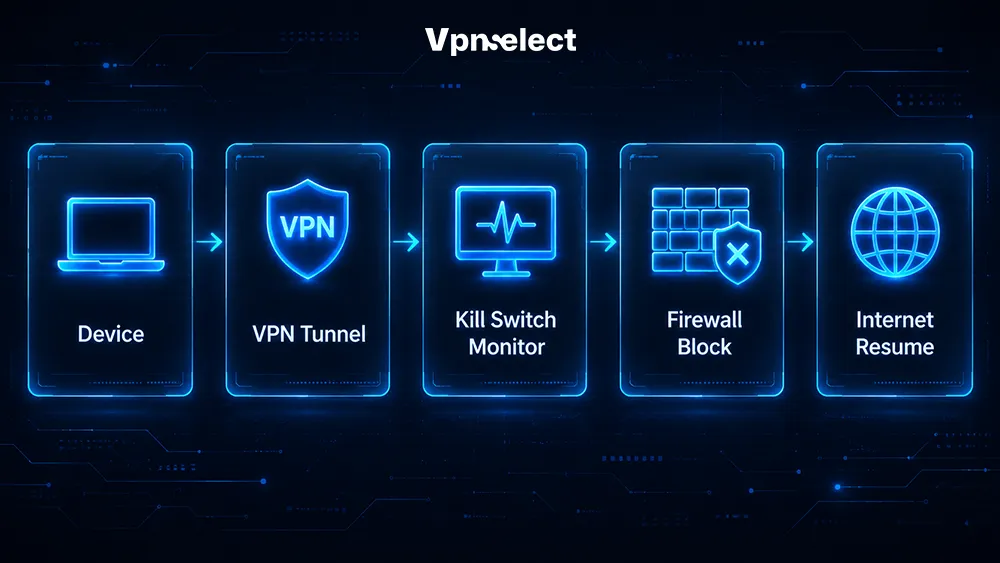
How a VPN Kill Switch Works
This workflow ensures your digital footprint remains protected even during unexpected network failures.
System-Level vs. Application-Level Kill Switches
VPN kill switches are implemented in two primary ways. System-level kill switches block all device traffic until the VPN is active, while application-level switches only halt selected apps, like browsers or torrent clients, during a drop. Native OS options such as Android’s “Always-on VPN” mimic system-level behavior for continuous protection.
|
Feature |
System-Level Kill Switch | Application-Level Kill Switch |
|
Coverage |
All device traffic | Specific apps only |
| Best For | Complete privacy across all connections |
Targeted app protection |
| Example | Windows/macOS VPN settings |
Torrent client or browser apps |
System-level switches provide maximum protection, while app-level switches allow flexibility without interrupting unrelated services. Learn more in our complete VPN guide.
VPN Kill Switch vs. Split Tunneling
A kill switch stops all traffic when the VPN drops, whereas split tunneling allows selected apps to bypass the encryption. Understanding the interplay between a VPN kill switch and split tunneling helps you configure an environment that balances absolute privacy with local network access.
|
Feature |
VPN Kill Switch | Split Tunneling |
|
Function |
Block traffic on VPN drop | Route select apps outside VPN |
| Purpose | Prevent leaks |
Access local and VPN networks simultaneously |
| Use Case | Maximum privacy |
Work and personal browsing balance |
Kill switches ensure data never leaks during disconnects, while split tunneling helps manage network access without sacrificing performance.

Limitations and Reality Checks
While a kill switch blocks traffic, users should ask themselves: What does a VPN hide? Knowing the answers helps you avoid false security assumptions.
Users may experience occasional software bugs or misconfigurations. Internet access interruptions are intentional, and the feature can sometimes interfere with legitimate network activity. Active testing ensures the kill switch works as intended.
Key limitations:
- Software glitches causing false triggers or failure to block traffic
- Configuration errors in firewall or app-level settings
- Temporary internet interruptions when the VPN disconnects
- Incompatibility with some older devices or operating systems
- Application-level switches may leave non-selected apps exposed
Proper setup and regular verification help mitigate these risks, ensuring reliable protection without unnecessary frustration.
How to Set Up, Test, and Manage Your VPN Kill Switch
A kill switch is not a set-it-and-forget-it feature. Its behavior depends on whether it’s tied to the device firewall or individual applications. Match the trigger mechanism to your network environment and validate that data packets are truly blocked.
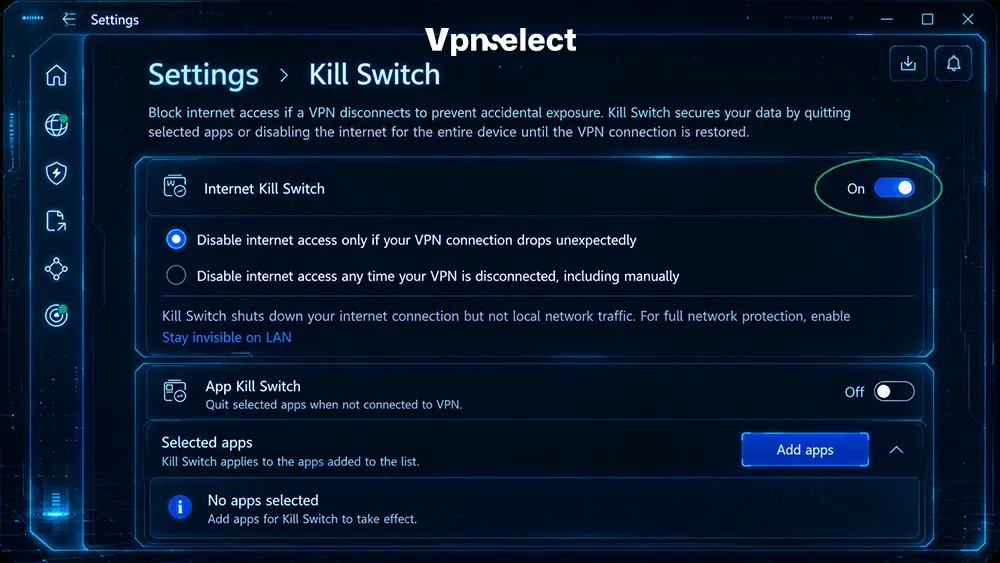
Enable a VPN Kill Switch
- Desktop (Windows/macOS): Open your VPN app, navigate to advanced security settings, and toggle the system-level or application-level switch. If your connection blocks completely after enabling it, look into the technical settings and verify what are VPN ports that need to be opened in your network firewall to allow secure traffic through.
- Mobile (Android/iOS): Use the in-app toggle for standard kill switch activation. On Android, enable “Block connections without VPN” under Always-on VPN. On iOS, native security settings handle this automatically via Apple’s NetworkExtension framework, though enterprise users can enforce a strict, permanent block using supervised MDM profiles.
- Verification: Check that your VPN app shows the kill switch as active before starting sensitive online activity.
This approach ensures consistent protection across devices and connection types.
Test If Your Kill Switch Is Working
A kill switch shouldn’t just be trusted blindly; it needs to be actively verified. You can simulate a network drop to ensure your software responds instantly and blocks unencrypted data leaks.
Follow these steps to safely test your connection:
Step 1: Open an active monitor
Open a live IP leak testing webpage or prepare a command-line utility to track your connection status in real-time.
Step 2: Initialize a continuous ping test
This allows you to monitor your live connection data packets frame-by-frame.
- On Windows: Open Command Prompt and type ping 8.8.8.8 -t (the -t flag forces the command to ping Google’s DNS continuously until you manually stop it).
- On macOS / Linux: Open Terminal and type ping 8.8.8.8 (it runs continuously by default).
Step 3: Disconnect the VPN intentionally
While the ping test is actively running in your terminal window, force a connection drop by suddenly switching to a different VPN server or briefly disconnecting from your Wi-Fi network.
Step 4: Analyze the terminal output
If your kill switch is working properly, the terminal will immediately stop showing successful response times and instead display “Request timed out” or “General failure”. This proves all internet traffic has been successfully blocked.
If the terminal continues to receive successful replies while the VPN is disconnecting, your data is actively leaking over your ISP’s unsecured network.
Step 5: Reconnect the VPN
Once you turn the VPN back on, observe whether normal internet traffic and ping replies resume safely.
Testing regularly guarantees that your kill switch effectively blocks data when needed, ensuring your real IP address is never accidentally exposed.
Troubleshooting Common Connection Issues
Check out frequent problems and practical fixes to keep your kill switch functioning smoothly.
|
Issue |
Cause | Solution |
|
Internet remains blocked after disconnect |
Firewall rules not reset | Restart the VPN client or reset network adapters |
| Application crash during VPN drop | App-level kill switch conflict |
Update app, check kill switch settings, or switch to system-level mode |
| LAN or printer sharing interrupted | System-level block |
Adjust exceptions in firewall or share settings |
Final Thoughts
After exploring what is a VPN kill switch, users should consider it as a core privacy feature rather than optional. It prevents sudden exposure of your IP, DNS, and traffic when VPN connections drop unexpectedly. By enabling, testing, and monitoring this feature, you maintain consistent protection during online activity.
FAQs
Do all VPNs include a kill switch?
Not all providers offer a kill switch. While most reputable VPNs include it, some free or basic plans may lack the feature. Always verify in the settings or feature list before relying on it for privacy.
Will a kill switch slow down my internet connection?
A properly configured kill switch does not impact speed during normal VPN operation. Temporary delays occur only when the VPN disconnects, as traffic is blocked until the tunnel is restored.
Should I keep it enabled all the time?
Yes. Keeping the kill switch active ensures continuous protection, particularly when using public Wi-Fi, traveling, or accessing sensitive information. Disable only if troubleshooting connectivity issues temporarily.


Leave a comment